matplotlib fonts

  • 데이터 시각화 결과물에는 글자가 많이 들어갑니다.
  • 축 레이블, 눈금 레이블, 타이틀 뿐 아니라 그림 위에 데이터를 명시하기도 합니다.
  • 글꼴, 글자 크기, 스타일 등을 자유자재로 다뤄봅니다.

1. Matplotlib 글꼴

matplotlib.axes.Axes.text
matplotlib.font_manager
matplotlib User’s Guide #Text properties and layout
Pega Devlog: Matplotlib Defaults & Fonts

  • 그림 곳곳에는 글자가 있습니다.

    1
    2
    3
    4
    5
    6
    7
    8
    9
    10
    11
    12
    13
    14
    15
    16
    17
    18
    19
    20
    21
    22
    23
    24
    25
    26
    27
    28
    29
    30
    # sample data
    X = ["AAA", "BBB", "CCC"]
    Y = [500, 300, 800]

    # Figure, Axes 생성
    fig, ax = plt.subplots(figsize=(6,3))

    # 가로 bar plot
    ax.barh(X, Y)

    # xticklabels
    xticks = ax.get_xticks()
    ax.set_xticks(xticks)
    ax.set_xticklabels([f"{int(x/100):d}" for x in xticks])

    # yticks
    ax.invert_yaxis()

    # labels
    ax.set_xlabel("xlabel")
    ax.set_ylabel("ylabel")

    # title
    ax.set_title("title")

    # text & annotation
    ax.text(700, 0, "text")
    ax.annotate("annotate", (Y[1], 1))

    fig.tight_layout()


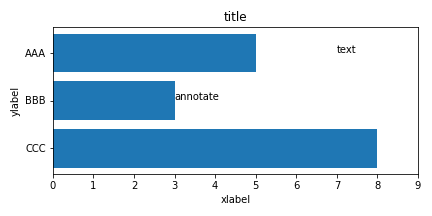
  • 글꼴(font), 크기, 스타일, 굵기(weight) 등은 적절하게 바뀌어 사용되어야 합니다.

  • 세 가지 방법을 사용해서 바꿀 수 있습니다.
    • 1. 매개변수를 직접 전달: fontsize, fontweight, fontstyle을 사용합니다.
    • 2. 글꼴 세팅 저장 (1): matplotlib.font_manager.FontProperties()를 사용해 세팅을 전달합니다.
    • 3. 글꼴 세팅 저장 (2): fontdict를 사용해 전달합니다.

2. fontstyle & fontsize

  • fontstyle은 [“normal”, “italic”, “oblique”]가 가능하지만 italic과 oblique는 동일합니다.
  • fontsizestring과 포인트 크기로 설정할 수 있습니다.
  • 함께 묶어서 그려보겠습니다. 먼저 string으로 설정한 경우입니다.
    1
    2
    3
    4
    5
    6
    7
    8
    9
    10
    11
    fontsizes = ['xx-small', 'x-small', 'small', 'medium', 'large', 'x-large', 'xx-large']
    fontstyles = ['normal', 'italic', 'oblique']

    fig, ax = plt.subplots(figsize=(6,3), sharex=True, sharey=True, constrained_layout=True)

    for j, fontsize in enumerate(fontsizes):
    ax.text(0.01, 0.14*j+0.01, f"{fontsize}", bbox={"boxstyle":"square", "pad":0.4, "facecolor":"w", "edgecolor":"lightgray"})
    for i, fontstyle in enumerate(fontstyles):
    ax.text((i+1)*0.3, 0.14*j+0.03, f"{fontstyle}", fontsize=fontsize, fontstyle=fontstyle)

    ax.axis(False)

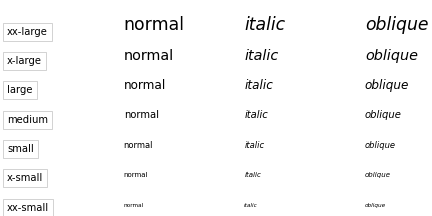
  • string의 [‘xx-small’, ‘x-small’, ‘small’, ‘medium’, ‘large’, ‘x-large’, ‘xx-large’]
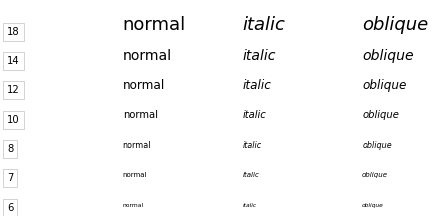
  • 숫자 형식으로는 [6, 7, 8, 10, 12, 14, 18]에 대응됩니다.
    1
    2
    3
    4
    5
    6
    7
    8
    9
    10
    11
    fontsizes = [6, 7, 8, 10, 12, 14, 18]
    fontstyles = ['normal', 'italic', 'oblique']

    fig, ax = plt.subplots(figsize=(6,3), sharex=True, sharey=True, constrained_layout=True)

    for j, fontsize in enumerate(fontsizes):
    ax.text(0.01, 0.14*j+0.01, f"{fontsize}", bbox={"boxstyle":"square", "pad":0.4, "facecolor":"w", "edgecolor":"lightgray"})
    for i, fontstyle in enumerate(fontstyles):
    ax.text((i+1)*0.3, 0.14*j+0.03, f"{fontstyle}", fontsize=fontsize, fontstyle=fontstyle)

    ax.axis(False)

3. fontfamily & fontweight

  • 글꼴은 fontfamily, 두께는 fontweight로 변경합니다.

  • 그리고 두께는 글꼴에 따라 적용되는 정도가 다릅니다.

    1
    2
    3
    4
    5
    6
    7
    8
    9
    10
    11
    12
    13
    fontweights = ['ultralight', 'light', 'normal', 'regular', 'book', 'medium', 'roman', 'semibold', 'demibold', 'demi', 'bold', 'heavy', 'extra bold', 'black']
    fontfamilies = ["serif", "monospace", "NanumGothic", "Lato", "NanumBarunGothic"]

    fig, ax = plt.subplots(figsize=(12,6), sharex=True, sharey=True, constrained_layout=True)

    for j, fontweight in enumerate(fontweights):
    ax.text(0.01, 0.05*j+0.03, f"{fontweight}", bbox={"boxstyle":"square", "pad":0.4, "facecolor":"w", "edgecolor":"lightgray"})
    for i, fontfamily in enumerate(fontfamilies):
    ax.text((i+1)*0.2, 0.05*j+0.03, f"{fontfamily}", fontsize=14, fontweight=fontweight, fontfamily=fontfamily)

    ax.set_xlim(0, 1.23)
    ax.set_ylim(0, 0.72)
    ax.axis(False)


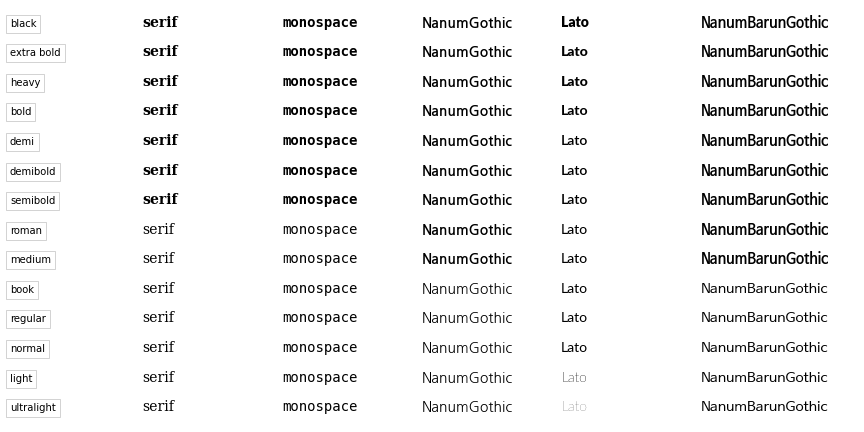
  • 옵션에 따라 굵어지는 지점이 다릅니다.

    • serif, monospacesemibold부터,
    • NanumGothic과 NanumBarunGothicmedium부터 굵어집니다.
    • 그리고 Lato여러 단계로 나뉩니다.

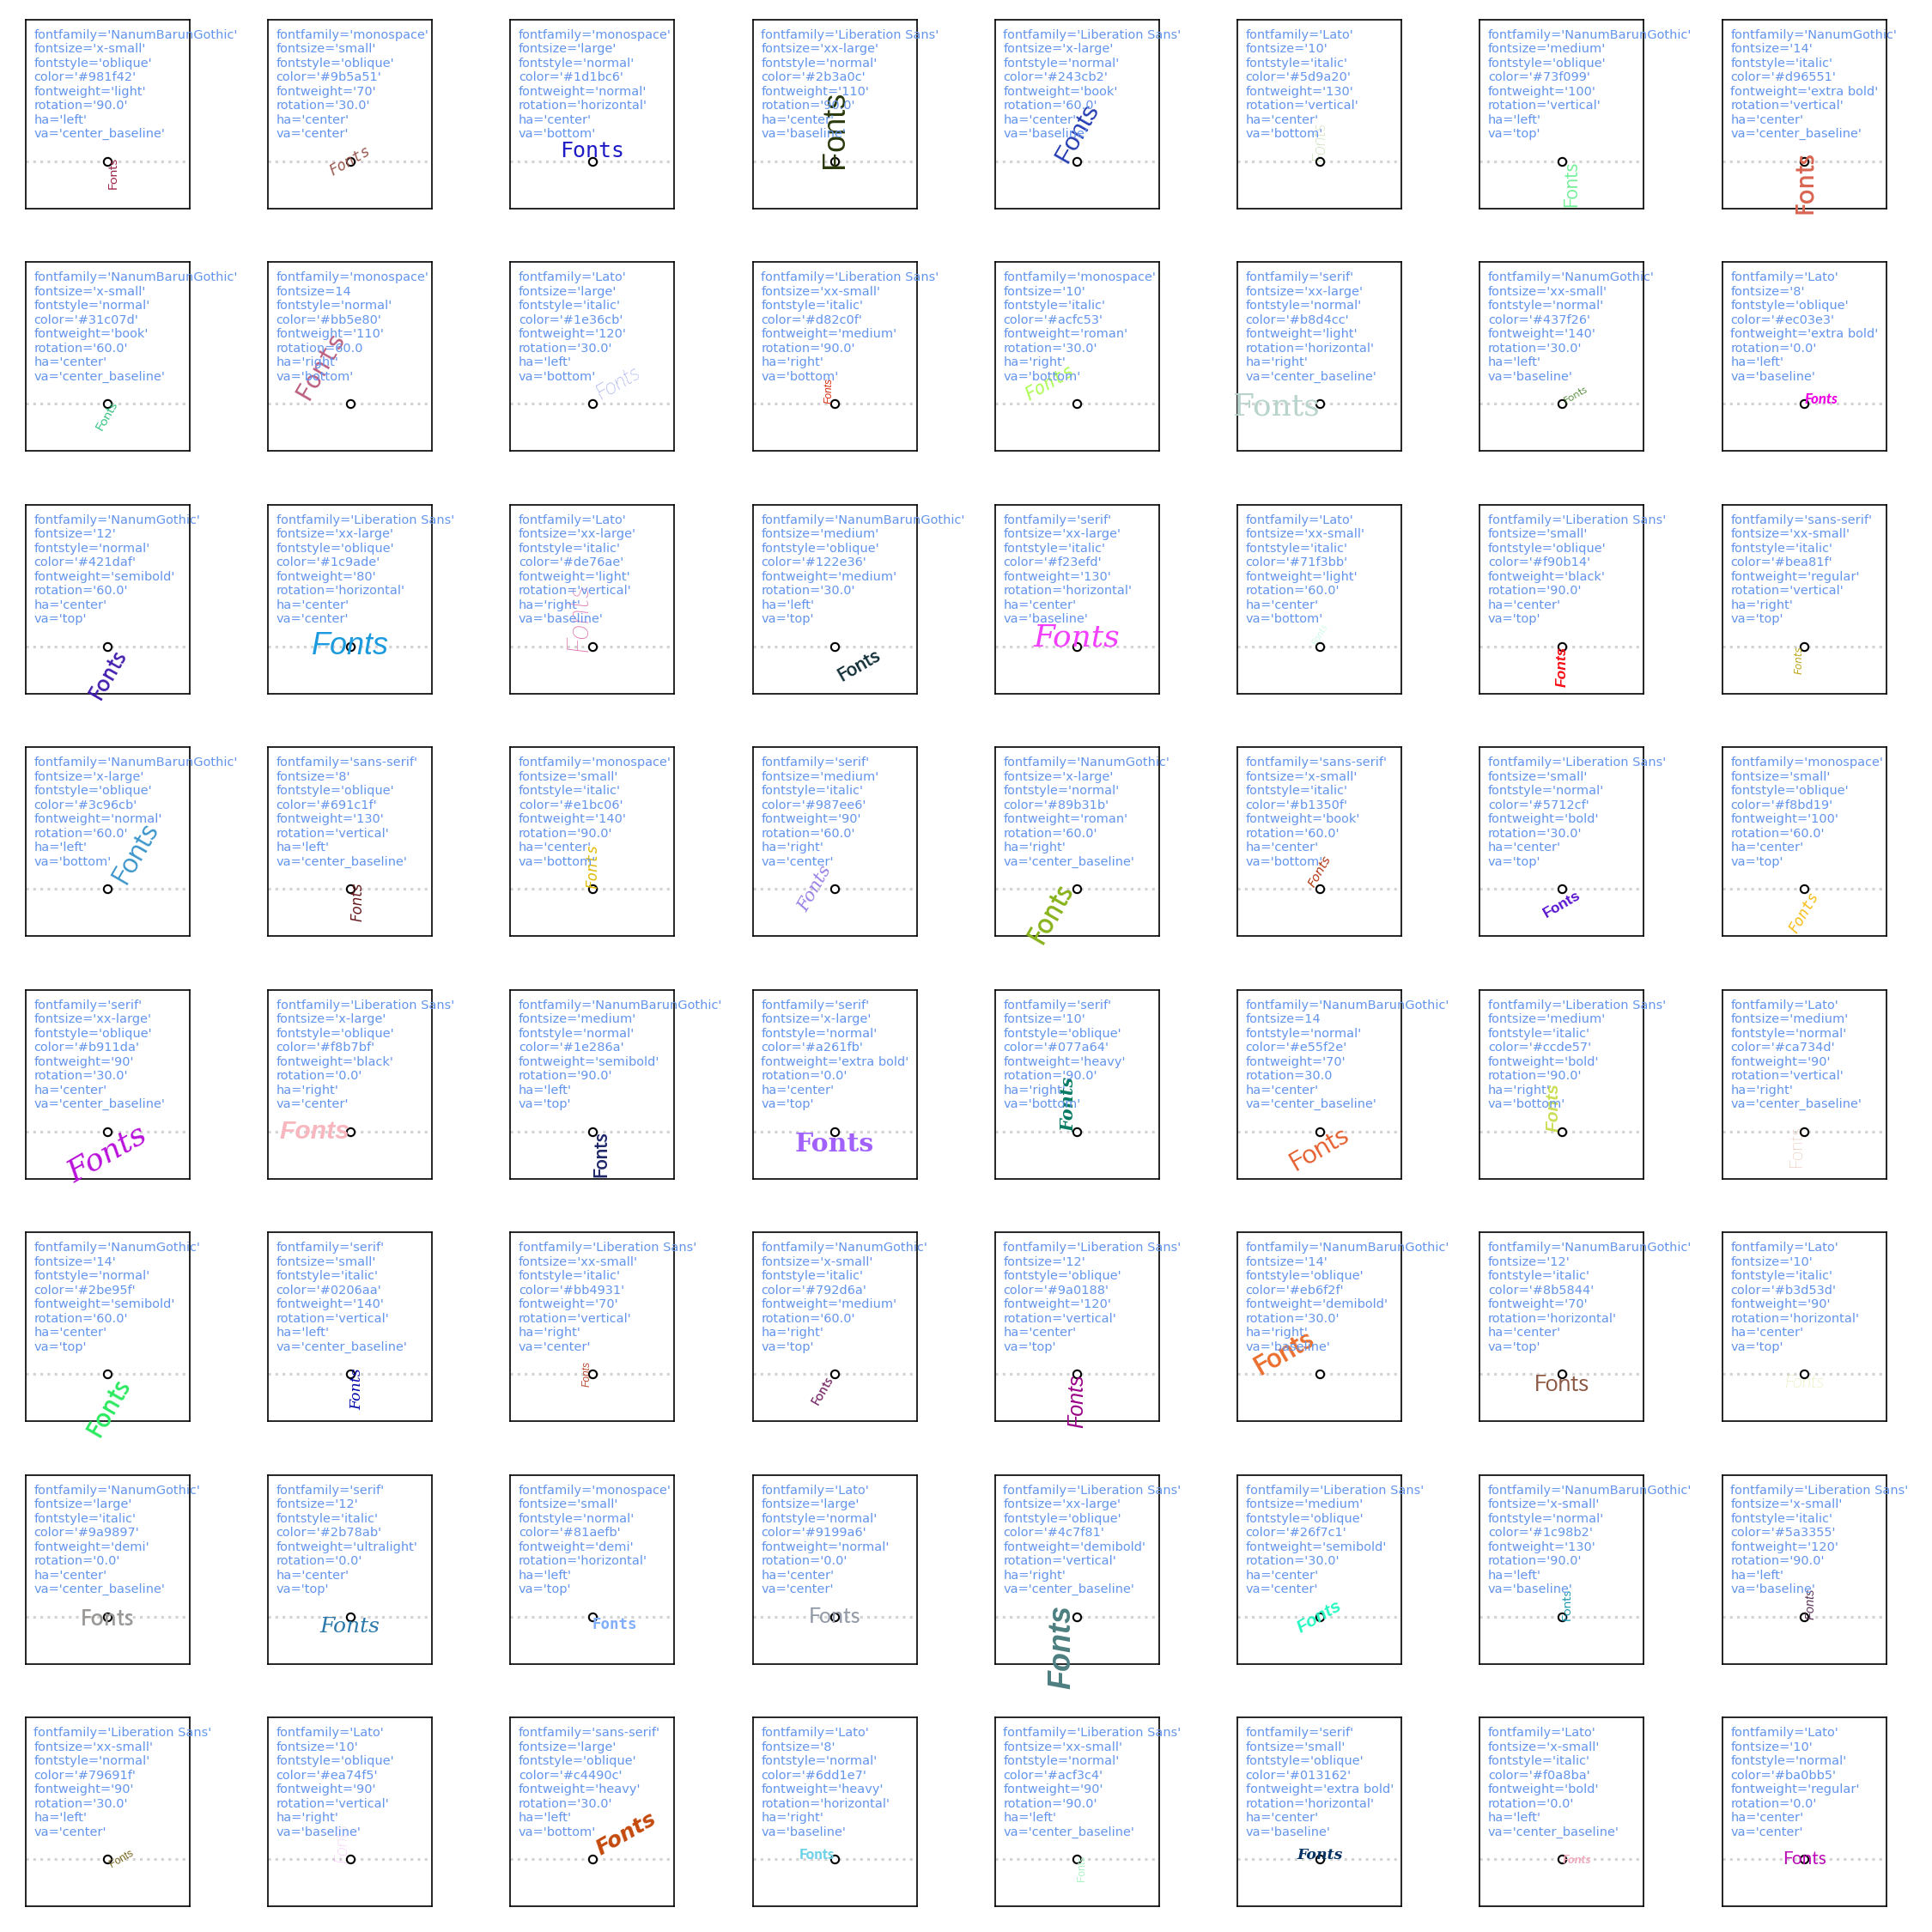
4. fonts random cheatsheet

  • Matplotlib의 fonts 옵션은 .plot()만큼이나 다양합니다.
    fontfamily: 글꼴
    fontsize: 글꼴 크기
    fontstyle: 일반 vs 기울임
    fontweight: 글꼴 굵기
    rotation: 회전
    ha or horizontalalignment: 가로 정렬
    va or verticalalignment: 세로 정렬
  • 모든 효과를 나열하여 보기 힘들기 때문에 여러 매개변수를 적용한 표를 만듭니다.
  • 실행할 때마다 랜덤으로 다른 옵션이 적용됩니다.
    1
    2
    3
    4
    5
    6
    7
    8
    9
    10
    11
    12
    13
    14
    15
    16
    17
    18
    19
    20
    21
    22
    23
    24
    25
    26
    27
    28
    29
    30
    31
    32
    33
    34
    35
    36
    37
    38
    39
    40
    41
    42
    43
    44
    45
    46
    47
    48
    49
    50
    51
    52
    from matplotlib import colors

    fig, axes = plt.subplots(ncols=8, nrows=8, figsize=(15, 15), sharex=True, sharey=True)
    axs = axes.ravel()

    fontfamilies = ["serif", "sans-serif", "monospace", "NanumGothic", "Lato", "NanumBarunGothic", "Liberation Sans"]
    fontsizes = ['xx-small', 'x-small', 'small', 'medium', 'large', 'x-large', 'xx-large'] + list(range(8, 16, 2))
    fontstyles = ['normal', 'italic', 'oblique']
    fontweights = ['ultralight', 'light', 'normal', 'regular', 'book', 'medium', 'roman', 'semibold', 'demibold', 'demi', 'bold', 'heavy', 'extra bold', 'black'] + list(range(70, 150, 10))

    rotations = list(np.linspace(0, 90, 4)) + ["vertical", "horizontal"]
    has = ["center", "left", "right"]
    vas = ['center', 'top', 'bottom', 'baseline', 'center_baseline']

    len_ff = len(fontfamilies)
    len_fsize = len(fontsizes)
    len_fstyle = len(fontstyles)
    len_fweight = len(fontweights)
    len_rot = len(rotations)
    len_ha = len(has)
    len_va = len(vas)

    for ax in axs:
    fontfamily = fontfamilies[np.random.choice(len_ff)]
    fontsize = fontsizes[np.random.choice(len_fsize)]
    fontstyle = fontstyles[np.random.choice(len_fstyle)]
    fontweight = fontweights[np.random.choice(len_fweight)]
    color = colors.to_hex([np.random.random(), np.random.random(), np.random.random()])
    rotation = rotations[np.random.choice(len_rot)]
    ha = has[np.random.choice(len_ha)]
    va = vas[np.random.choice(len_va)]

    ax.text(0, -1, "Fonts",
    fontfamily=fontfamily, fontsize=fontsize, fontstretch=fontstretch,
    fontstyle=fontstyle, fontweight=fontweight, color=color,
    rotation=rotation, ha=ha, va=va)
    ax.scatter(0, -1, s=20, c="w", ec="k", zorder=2)
    ax.axhline(-1, ls=":", c="lightgray", zorder=1)
    ax.set_xlim(-2, 2)
    ax.set_ylim(-2, 2)
    ax.set_xticks([])
    ax.set_yticks([])

    for text_y, e in zip(np.linspace(0.9, 0.3, 9), ["fontfamily", "fontsize", "fontstretch", "fontstyle", "color", "fontweight", "rotation", "ha", "va"]):
    param = f"{e}={eval(e)}"
    if (e in ["fontfamily", "fontstyle", "color", "fontweight", "ha", "va"]) \
    or isinstance(fontsize, str) or isinstance(rotation, str) or isinstance(fontstretch, str) or isinstance(fontweight, str):
    param = param.replace("=", "='") + "'"
    ax.text(0.05, text_y, param, transform=ax.transAxes, fontsize="x-small", color="cornflowerblue")

    fig.set_facecolor("w")
    fig.tight_layout()


도움이 되셨나요? 카페인을 투입하시면 다음 포스팅으로 변환됩니다

Share