7. Batch Processing: 이미지 일괄 처리
Reference
A Fiji Scripting Tutorial #3. Inspecting properties and pixels of an image
-
대량의 이미지를 한번에 처리해야 하는 경우, 이미지를 하나 하나 불러오는 것보다 일괄처리가 효과적입니다.
-
이미지가 모여 있는 폴더를 지정할 수도 있고,
분석 대상 이미지들을 화면에 띄운 후 떠 있는 이미지들을 일괄적으로 처리할 수도 있습니다.
7.1. 이미지 파일 일괄 처리
-
그림파일 다섯 개가 있는 예제파일을 받아 한 폴더에 풉니다.
-
아래 코드를 실행하여 다섯 이미지의 데이터를 일괄적으로 구해봅시다.
- ImageJ > Tutorial > 6. Image Data 분석 글에 있는 6.2.2.1. 코드를 이용해 보겠습니다.
- 면적, 평균, 중간값 등을 일괄적으로 추출하기 위해 python의
def문을 사용하여 함수를 만들어줍니다. - 그리고
os.listdir()을 이용해 지정된 디렉토리 내의 함수를 훑으면서 이미지를 분석하고 그 결과를 출력합니다.
1
2
3
4
5
6
7
8
9
10
11
12
13
14
15
16
17
18
19
20
21
22
23
24
25
26
27
28
29
30
31
32
from ij import IJ
import os
# 1. Load Image 위치:
folder = r"C:\Arbeitplatz\19_hexoblog_backup\source\_posts\ImageJ-tutorial-7_Multi\7_batch_1"
# 2. Image 통계 정보 일괄 분석
# 2-1. 함수 정의
def getStatistics(imp):
stats = imp.getStatistics()
# 면적, 평균, 중간값, 최소값, 최대값을 가져옴
return stats.area, stats.mean, stats.median, stats.min, stats.max
# 확장자가 ".tif"인 파일들로부터 데이터 읽어오기.
for filename in os.listdir(folder): # 폴더 안에 있는 파일에 하나씩 접근
if filename.endswith(".tif"): # 파일 이름이 ".tif"로 끝난다면,
print "\nProcessing", filename
fullpath = os.path.join(folder, filename) # 폴더명과 파일명을 결합
print "fullpath", fullpath
imp = IJ.openImage(fullpath) # 파일을 불러온다.
if imp is None: # 파일이 제대로 불러지지 않으면,
print "Could not open image from file:", filename # 에러메시지 출력
continue # 다른 파일을 읽어본다.
# 파일이 불러지면, 앞서 정의한 getStatistics() 함수를 실행해서 데이터를 분석한다.
area, mean, median, vmin, vmax = getStatistics(imp)
print "Image statistics for", imp.title
print "Area:", area
print "Mean:", mean
print "Median:", median
print "Min and max:", vmin, "-", vmax
else: # 파일 이름이 ".tif"로 끝나지 않으면
print "Ignoring", filename # 파일 이름만 출력하고 넘어간다.- 실행 결과가 전체를 보이기엔 너무 길어서 아래 창에 마지막 파일에 대한 실행 결과만을 도시하였습니다.
- 파일명(7_batch_1_5.tif), 면적(
Area: 2160.97), 평균(Mean: 11800.02), 중간값(Median: 0.0) 등이 출력되어 있습니다. - 최대값(
max: 65535.0)이 이제까지 다룬 이미지(255)와 달리 65536입니다. 16-bit 이기 때문입니다.
1
2
3
4
5
6
7
8
....
Processing 7_batch_1_5.tif
fullpath C:\Arbeitplatz\19_hexoblog_backup\source\_posts\ImageJ-tutorial-7-Batch\7_batch_1\7_batch_1_5.tif
Image statistics for 7_batch_1_5.tif
Area: 2160.97959184
Mean: 11800.0291717
Median: 0.0
Min and max: 0.0 - 65535.0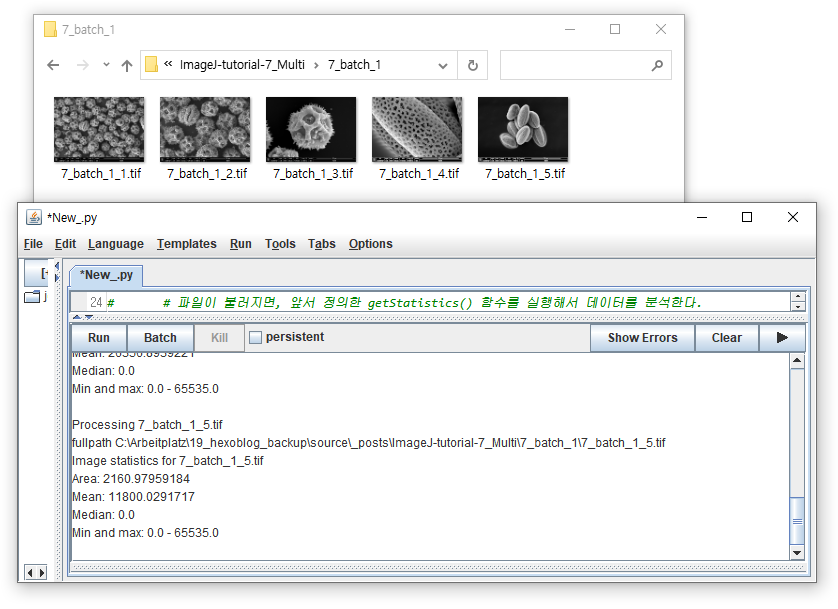
7.2. 이미지 목록(list) 만들기
-
7.1.에서는 특정 위치의 파일들을 하나씩 건드려보는 방식을 취했습니다.
-
그러나 동일한 파일 집합을 대상으로 여러 오퍼레이션을 하는 경우에, 미리 파일을 묶어놓으면 좋습니다.
-
화면에 띄워놓은 이미지들은
WindowManager모듈을 이용하여 리스트 형식으로 모을 수 있습니다.1
2
3
4
5
6
7from ij import WindowManager as WM
images = [] # 빈 리스트 생성
for id in WM.getIDList():
images.append(WM.getImage(id))
print images- 처럼 다섯 그림을 모두 띄워놓고 실행하면, 다음과 같은 메시지가 나옵니다.
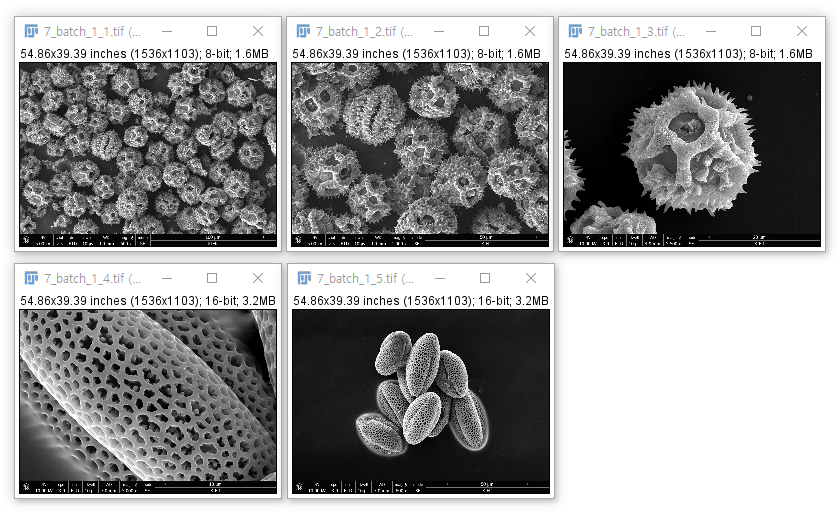
1
[img["7_batch_1_1.tif" (-67), 8-bit, 1536x1103x1x1x1], img["7_batch_1_2.tif" (-68), 8-bit, 1536x1103x1x1x1], img["7_batch_1_3.tif" (-72), 8-bit, 1536x1103x1x1x1], img["7_batch_1_4.tif" (-73), 16-bit, 1536x1103x1x1x1], img["7_batch_1_5.tif" (-74), 16-bit, 1536x1103x1x1x1]]
- 각 이미지에 대해 -67 ~ -74 까지의 id가 매겨져 있습니다.
- 이미지의 이름이나 크기 등에 무관하게
ImageJ가 실행된 후 열어본 이미지들에 붙는 일련번호입니다. - 그 외의 정보는 ImageJ > Tutorial > 2. Image File 구조 에 기술되어 있습니다.
-
이미지 리스트 작성을 더 짧게 할 수도 있습니다.
ImageJ > Tutorial > 4. Python Basic 에서 설명한list comprehension과map을 사용하면 됩니다.1
2
3
4
5
6
7
8
9
10from ij import WindowManager as WM
# 1. list comprehension
images_lc = [WM.getImage(id) for id in WM.getIDList()]
# 2. map
images_map = map(WM.getImage, WM.getIDList())
print "images (list comprehension):\n", images_lc
print "\nimages (map):\n", images_map- 다음과 같이 두 가지 방식에서 동일한 결과가 얻어집니다.
1
2
3
4
5images (list comprehension):
[img["7_batch_1_1.tif" (-67), 8-bit, 1536x1103x1x1x1], img["7_batch_1_2.tif" (-68), 8-bit, 1536x1103x1x1x1], img["7_batch_1_3.tif" (-72), 8-bit, 1536x1103x1x1x1], img["7_batch_1_4.tif" (-73), 16-bit, 1536x1103x1x1x1], img["7_batch_1_5.tif" (-74), 16-bit, 1536x1103x1x1x1]]
images (map):
[img["7_batch_1_1.tif" (-67), 8-bit, 1536x1103x1x1x1], img["7_batch_1_2.tif" (-68), 8-bit, 1536x1103x1x1x1], img["7_batch_1_3.tif" (-72), 8-bit, 1536x1103x1x1x1], img["7_batch_1_4.tif" (-73), 16-bit, 1536x1103x1x1x1], img["7_batch_1_5.tif" (-74), 16-bit, 1536x1103x1x1x1]]
7.3. 이미지 list 활용하기
7.3.1. 이름으로 파일 찾기
-
읽어들인 이미지 중에서 내가 찾는 이름(“7_batch_1_4.tif”)의 파일이 있는지 확인해보겠습니다.
-
ImageJ > Tutorial > 4. Python Basic 에서 설명한
filter를 사용하면 효과적입니다.1
2
3
4
5
6
7
8
9
10
11
12
13
14
15from ij import WindowManager as WM
# 1. map을 이용해 image list 작성
imps = map(WM.getImage, WM.getIDList())
# 2. 함수 이름 비교 함수
def match(imp):
# 이미지(imp)의 title에 찾는 이름이 있으면 true
return imp.title.find("7_batch_1_4.tif") > -1
# 3. filter를 이용해서 파일 존재 확인
matching = filter(match, imps)
# 4. 결과 출력
print matching- 실행 결과, 성공적으로 파일을 찾았습니다.
1
[img["7_batch_1_4.tif" (-73), 16-bit, 1536x1103x1x1x1]]
- 그리고 당연히,
filter대신for loop,list comprehension등을 사용할 수 있습니다.
1
2
3
4
5
6
7
8# 1: 'for' loop (별도의 리스트를 생성해야 합니다)
matching = []
for imp in imps:
if match(imp):
matching.append(imp)
# Method 2: list comprehension
matching = [imp for imp in imps if match(imp)]
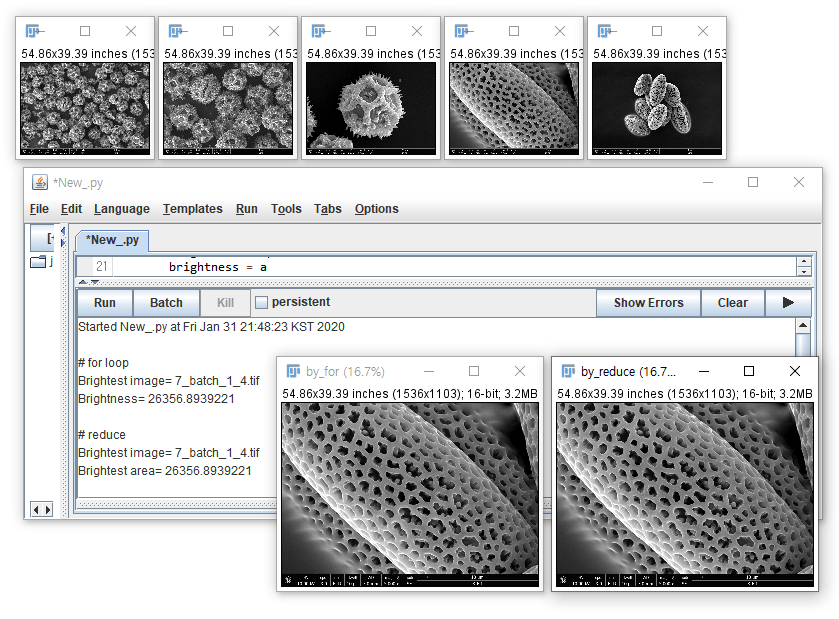
7.3.2. 가장 밝은 이미지 찾기
-
이미지의 평균 밝기를 비교해서 가장 큰 것을 찾아보겠습니다.
- 이미지를 하나씩 열면서 방금 연 이미지의 밝기가 기존 기록보다 더 크면 갱신하는 작업입니다.
for loop과reduce를 비교해 보겠습니다.
1
2
3
4
5
6
7
8
9
10
11
12
13
14
15
16
17
18
19
20
21
22
23
24
25
26
27
28
29
30
31
32
33
34
35
36
37
38
39
40
41
42
43
44
45
46
47from ij import IJ
from ij import WindowManager as WM
from ij.plugin import Duplicator
# 1. map을 이용해 image list 작성
imps = map(WM.getImage, WM.getIDList())
# 2. 평균 명도를 구하는 함수
def bright(imp):
stats = imp.getStatistics()
return stats.mean
# 3. 가장 밝은 이미지 찾기
# 3-1. for loop
brightest = None
brightness = 0
for imp in imps:
a = bright(imp)
if brightest is None:
brightest = imp
brightness = a
else:
if a > brightness:
brightest = imp
brightness = a
print "\n# for loop"
print "Brightest image=", brightest.title
print "Brightness=", brightness
brightest_for = Duplicator().run(brightest)
brightest_for.title = "by_for"
brightest_for.show()
# 3-2. reduce
def brightestImage(imp1, imp2):
return imp1 if bright(imp1) > bright(imp2) else imp2
largest = reduce(brightestImage, imps)
print "\n# reduce"
print "Brightest image=", brightest.title
print "Brightest area=", brightness
brightest_reduce = Duplicator().run(brightest)
brightest_reduce.title = "by_reduce"
brightest_reduce.show("by_reduce")for loop은 가장 큰 이미지와 그 넓이를 사전에 정의하고, image 리스트인 imps에 저장된 이미지를 하나씩 꺼내보면서 새로 꺼낸 이미지의 넓이가 기존 기록을 갱신했는지 비교합니다.reduce는 이미지의 넓이를 비교하는 함수(brightestImage)와 이미지 리스트(imps)를 인자로 받아들여, imps에brightestImage를 적용합니다.